Using Nmap to identify open ports in a Docker environment
In this lab, I used Nmap to identify open ports on a Linux server, investigated the exposed services with lsof, and linked the discovered ports to running Docker containers.
In this DetonaDev Cyber Lab, I documented the use of Nmap to analyze open ports on a Linux server and understand which services were visible from another machine on the network.
The initial goal was simple: check if the SSH service was accessible. However, during the scan, Nmap revealed other open ports. From this, I investigated the server with commands like lsof and docker ps to understand which processes and containers were related to these ports.
This lab was important because it showed a common situation in real environments:
A machine can have more services exposed than it appears when we only look at the firewall.
For security, some sensitive data from images and results were hidden, such as real application names, containers, internal ports, and specific environment details.
1. Lab objective
The objectives of this lab were:
- Identify the IP of the Linux server;
- Check the UFW firewall status;
- Confirm connectivity between the MacBook and the server;
- Install and run Nmap;
- Identify open ports;
- Detect service versions;
- Investigate which processes were listening on the ports;
- Relate open ports with Docker containers;
- Document the result securely, hiding sensitive data.
2. Environment used
The lab was done using:
- MacBook as the source machine for the scan;
- Ubuntu Linux server as the target;
- SSH for remote administration;
- UFW as the local firewall;
- Nmap for port scanning;
- Docker for running applications;
lsofto identify processes listening for connections;docker psto relate published ports with containers.
The logic was to analyze the machine in two ways:
External view: MacBook using Nmap against the server
Internal view: Linux server showing running processes and containers
This comparison is essential in security, because Nmap shows how the server is seen from the outside, while internal commands show what is actually running.
3. Confirming the server IP
First, I confirmed the local IP address of the Linux server.
On the server, I ran:
hostname -I | awk '{print $1}'
This command shows only the first IPv4 address of the machine, avoiding exposing other addresses that were not necessary for the article.

The identified IP was used as a target in the following tests.
4. Checking the UFW firewall
Next, I checked the status of the local firewall with:
sudo ufw status
The most important point here was to confirm that the firewall was active and that the SSH port was allowed for the local network. The most relevant rule was:
22/tcp ALLOW 192.168.1.0/24
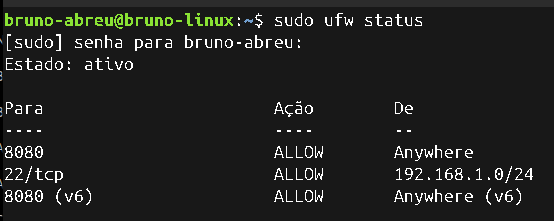
This means that port 22/TCP, used by SSH, was open only to devices on the local network.
5. Confirming Nmap on the MacBook
On the MacBook, I checked if Nmap was installed:
nmap --version

Nmap is a tool used for host discovery, open port identification, service detection, and basic network exposure analysis. In this lab, it was used only against a proprietary and authorized environment.
6. Testing connectivity with ping
Before doing the port scan, I tested if the MacBook could reach the Linux server over the network. On the MacBook, I ran:
ping 192.168.1.78
The result showed:
11 packets transmitted, 11 packets received, 0.0% packet loss
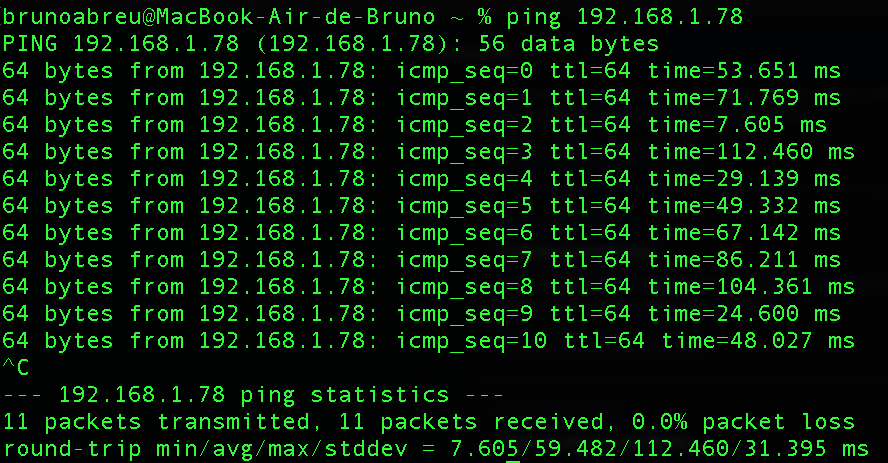
This confirmed that there was connectivity between the MacBook and the server.
7. First scan with Nmap
With connectivity confirmed, I ran the first basic scan:
nmap 192.168.1.78
Nmap identified that the host was up and found some open ports. The expected port was:
22/tcp open ssh
This port represents the SSH service, used for remote access to the server. However, the scan also showed other open ports. This indicated that there were more services accessible over the network, in addition to SSH.
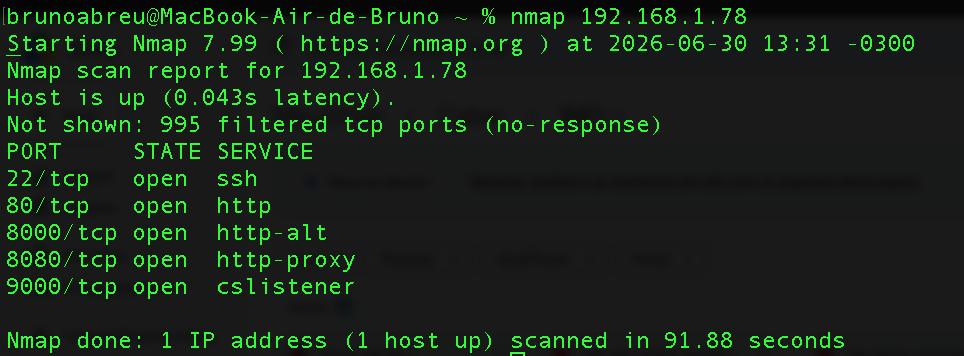
This was the first important point of the lab: the server had more open ports than I was initially considering.
8. Scan with version detection
After the basic scan, I ran a scan with version detection:
nmap -sV 192.168.1.78
The -sV option makes Nmap try to identify which service is responding on each open port. For example:
22/tcp open ssh OpenSSH
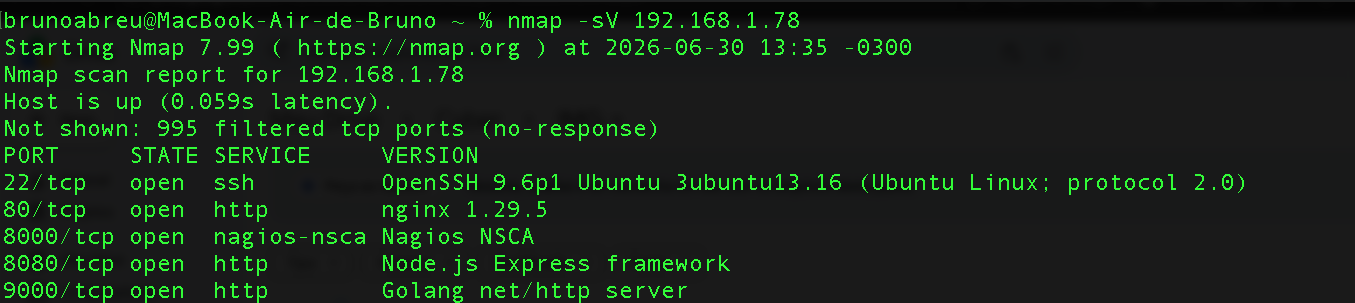
This shows that port 22 was open and that the identified service was OpenSSH. In addition to SSH, Nmap identified HTTP services and other services related to the environment.
9. Specific scan of the found ports
After the initial scan, I ran a targeted scan only on the identified ports.
nmap -p 22,80,8000,9000 192.168.1.78
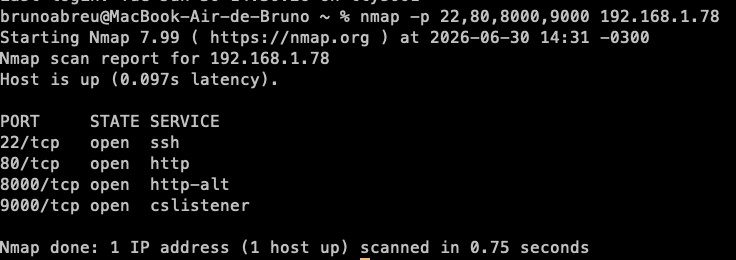
The -p option allows you to choose which ports will be checked. This is useful when we already know which ports appeared in a previous scan and we want to validate only those ports, in a faster and more objective way.
10. Specific scan with version detection
Next, I ran the specific scan again, but now with version detection:
nmap -sV -p 22,80,8000,8080,9000 192.168.1.78
This command combined two ideas:
-p→ choose specific ports-sV→ try to identify service and version
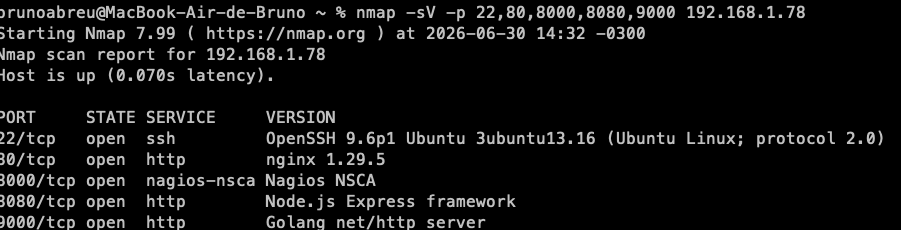
With this, Nmap showed not only that the ports were open, but also an estimate of the services responding on them. This type of information is useful for inventory, exposure surface analysis, and initial security investigation.
11. Investigating processes with lsof
After identifying open ports with Nmap, I needed to understand which processes were listening on the server. For this, I used:
sudo lsof -iTCP -sTCP:LISTEN -P -n
This command shows processes that are in the LISTEN state, that is, waiting for connections.
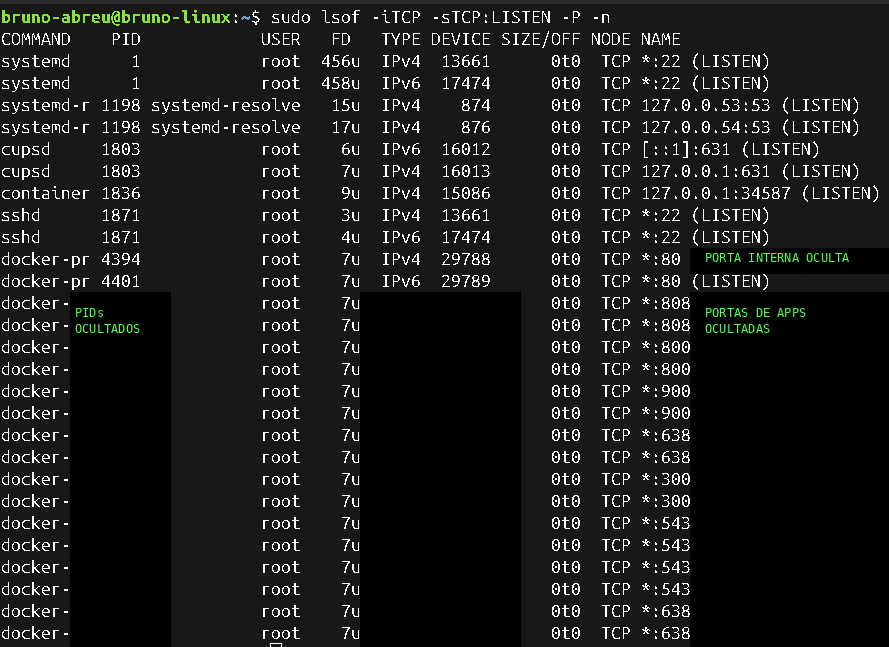
The most important part was realizing that several ports were associated with docker-proxy. This indicates that the ports were not necessarily being opened directly by services installed in the operating system, but rather by Docker containers that were publishing ports on the host.
12. Relating ports to Docker containers
To confirm the relationship between open ports and containers, I ran:
docker ps --format "table {{.ID}}\t{{.Names}}\t{{.Image}}\t{{.Ports}}"
This command shows the running containers and their published ports. The investigation confirmed that the ports found by Nmap were related to services running in Docker containers.

This was the main point of the lab: Nmap showed the external view of the server, while lsof and docker ps helped explain internally which processes and containers were related to the open ports.
13. What I learned in this lab
This lab showed that analyzing open ports requires more than just looking at a single tool. The complete reasoning was:
- Confirm the server IP
- Check the local firewall
- Test connectivity
- Run basic scan with Nmap
- Run scan with version detection
- Investigate processes with
lsof - Relate open ports to Docker containers
- Hide sensitive data before publishing
The main lesson was: an open port represents a service accessible over the network, and every accessible service increases the server's exposure surface.
14. External view versus internal view
One of the most important parts of the lab was comparing two perspectives.
The external view was done with Nmap:
nmap 192.168.1.78
This view answers the question: What can another machine see on this server?
The internal view was done with lsof and docker ps:
sudo lsof -iTCP -sTCP:LISTEN -P -n
docker ps --format "table {{.ID}}\t{{.Names}}\t{{.Image}}\t{{.Ports}}"
This view answers the question: Which processes or containers are opening these ports?
In security, both views are important.
- Nmap shows exposure.
- The operating system shows the cause.
- Docker shows the origin of the published services.
15. About hiding sensitive data
Since this lab was done in a real environment, some information was hidden before publication:
- Real application names;
- Container names;
- Specific Docker images;
- Internal service ports;
- Details that could expose the environment's structure.
This decision is part of responsible documentation. In a cybersecurity portfolio, it is not enough to show commands and results. It is also important to demonstrate care with sensitive information.
16. Conclusion
In this lab, I used Nmap to identify open ports on a Linux server and investigated the origin of these ports using internal system commands.
The scan revealed services beyond SSH. With lsof, I identified processes in a listening state. With docker ps, I confirmed that part of these ports was related to Docker containers publishing services on the host.
This lab reinforced important security concepts:
- Open port analysis;
- Service identification;
- Exposure surface;
- Difference between firewall, process, and container;
- Investigation with command-line tools;
- Care when publishing technical evidence from real environments.
The main conclusion is: Nmap shows what is exposed. Commands like lsof and docker ps help understand why it is exposed.
This type of analysis is fundamental for anyone studying network security, Blue Team, SOC, and secure Linux server administration.